Hello and welcome to my Tutorial Blog.

I hope give you inspiration with some some fabulous tutorials.

Thursday, 21 April 2011

Free Standing Pop Up Tutorial

Hi all,

Back today with another tutorial, I did squeeze you an extra one in this Tue (easter treat bag) but for some reason it didnt publish. Never mind if you scroll down you can see the tutorial under this one, so you have 2 to choose from today.

Todays tutorial is a Free Standing Pop Up Card, they look fabulous and the best thing is they do fold flat for posting.


Items
12 x 12 Card Stock
A4 Patterned Paper
Ribbon
3 Lrg Size Nesties
Die Cut Butterfly
Die Cut Sentiment

Step 1, Trim a piece of card to 28cm x 14.5cm


Step 2, Score your card at 2.5cm, 7cm, 9.5cm, 14cm, 18.5cm, 21cm & 25.5cm


Step 3, Along the centre (14cm) score line measure a point  in 2cm from either side of the card.


Step 4, Trim a slit out of the centre of the card between the 2cm points.


Step 5, Trim 2 peices of paper to 14cm x 2cm.


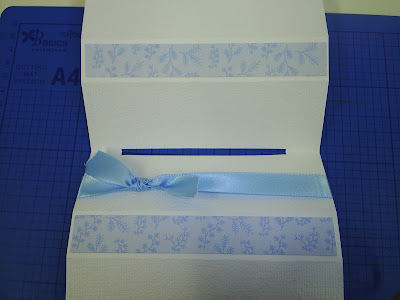
Step 6, Turn the card over to the good side and attach paper in the 2.5cm wide panels as shown.


Step 7, Using 3 Nesties Die Cut 2 pieces of card and 1 piece of patterned paper, layer together as shown.


Step 8, Wrap ribbon round one of the 4.5cm middle panels and tie a knot/bow


Step 9, Turning your card over so the back is facing you. Fold one of the 2.5cm flaps in, take your layered center piece, push through the slot and attach to the flap.


Step 10, Fold the card over and bring the two 2.5cm flaps together, folding them together inside the card.


Your card should look like this when standing up.


Step 11, Add a Die Cut butterfly and sentiment to finish.

Hope you have enjoyed this tutorial, do let us know if you make a card using this tutorial we would love to come and have a nosey.

Lyndsey xx


Tuesday, 19 April 2011

Easter Gift Bag Tutorial

** Edited to add - sorry for some reason this post did not publish as it should have on Tue so you have 2 tutorials today instead**

Hi all,

Being as its been a while since I posted a tutorial I am going to squeeze an extra one in this week, so you will have one today and another on Thursday.
I have decided to squeeze this extra one in today to give you time to make a last mintue easter gift, I taught this to my ladies in class last week and it went down a treat.

Easter Treat Bag


Items
1 x 6" Square Card Blank
6"sq Patterned Paper
6"sq Coloured Card
Border Punch/Decorative Scissors
A6 Clear Cello Bag
2 x Nesties plain/scalloped
Mini Eggs


Step 1, Score a line 2cm either side of the orignal score line


Step 2, Score a line 3cm in from the LH edge, mark a line 3cm in from the RH edge


Step 3, Trim off the 3cm from the RH egde


Step 4, Punch a border along the 3cm flap


Step 5, Trim a piece of paper to 9cm x 14cm, attach to the panel opposite the punched flap (make sure the pattern is facing the right way up)


Step 6, Die cut an aperture in the panel


This is what your bag should now look like


Step 7, Using a plain and scalloped nestie together die cut a frame from coloured card.


Step 8, Attach the fame to the bag using foam pads


Step 9, Place your eggs in a clear Cello Bag, fold the top over and attach to the back panel of the bag


Step 10, Place foam pads along the edge of the punched flap


Step 11, Fold over the flap and secure with the pads to create your bag.


Step 12, Add any addtional embellishments as required for decoration.

Hope you have enjoyed this tutorial, do pop back on Thursday for our scheduled tutorial.

Lyndsey xx

Thursday, 17 March 2011

Penny Spinner Tutorial

Hi all,

Time for another tutorial here at LORA Crafts, today I am going to show you how to make a fabulous spinner card using 2 1p's. As the card is interactive it is a great card for young kids, what their face light up with amazement as the image spins from one end of the card to the other.

As the card is aimed at kids I have used a fabulous Topper from the Kanban Tiny Hero range, fabby images in bold bright colours really make them stand out.

Items
1 x DL Card Blank
1 x A4 patterned Paper
1 x Card 20.5cm x 4cm (A)
1 x Card 20.5cm x 9.5cm (B)
1 x Image & Sentiment
Embellishments to suit


Step 1 - Using card (A) measure 1.5cm in from each edge

Step 2 - Trim out the middle section to create a slot

Step 3 - Apply a double layer of foam tape all around the outer edges of the piece of card

Step 4 - Take 2 1p's and attach two small foam dots onto one of them

Step 5 - Take this coin and place it in the slot underneath the card

Step 6 - Take the other coin and place it on top, once you have done this make sure your coins will spin easily along the strip

Step 7 - Take your patterned paper and trim to 20cm x 9cm, attach this to card (B)

Step 8 - Attach the slider strip of card onto the the panel and adhere to the card blank

Step 9 - Attach your chosen image onto the coin using glue/tape - again make sure this spins easily along the strip

Step 10 - Decorate the card with your sentiment and embellishments as required, remember not to block the spinner element of your card in any way.

Hope you have enjoyed this tutorial for a fun and interactive card.

** Please note I have used 5p coins in this tutorial - only because thats all I had to hand in my purse lol!!!

Lyndsey xx

Thursday, 10 March 2011

Double Twisted Easel Tutorial

Hi All,

Well its Thursday again, so time for another tutorial. I have had a lot of good feeback about these tutorials so far so lets hope you like today's just as much.

Today I am going to show you the tutorial for making a Double Twisted Easel, using the new Country Companions Collection. Please remember when you make your own version you dont have to use the exact same materials as me, ie - if I am using a stamp and you prefer decoupage then subsitute for whatever works best for you.

You will need :-

1 x DL Card Blank
1 x 12 x 12 Textured Card
2 x Patterned Papers
2 x Images
1 x Border Die/Punch - Decorative Scissors
Embellishments for decoration

Step 1, Take your card and trim to 20cm tall, then on one half of the card only, trim a horizontal line 10cm up from the outer edge to the middle score line.

Step 2, Score 2 diagonal lines from the top outside corners to the bottom centre corners.

Step 3, Fold your card over towards yourself along the centre score line, then fold the top inner corners of the triangles to meet the bottom outer corners.

Your card will look like this from the side.

Step 4, From your 12x12 card trim 1 piece 19.5cm x 9.5cm and 2 pieces 10cm x 10cm

Step 5, From your patterned paper trim 1 piece 19cm x 9cm, from the other piece trim 2 -  9.5cm x 9.5cm squares. Attach these pieces onto your card pieces leaving a border all the way round the edges.

Step 6, Take a piece of card, die cut/punch a border and trim to 19.5cm long (width to suit)

Step 7, Attach the border using foam pads/tape onto the 19.5cm x 9.5cm panel.

Step 8, Attach panel to the bottom base of your DL card.

Step 9, Attach the 2 10cm x 10cm squares onto your triangles, lining up the bottom corners and outside edges.

Step 10, Mount your images on the square panels and embellish card as required.

Hope you have enjoyed this tutorial and have found it helpful. Do get in touch if you make a card using this tutorial we would love to see your creations.

Lyndsey xx

Thursday, 3 March 2011

Waterfall Tutorial

Hi all,

Welcome to our Thursday Tutorial, today I have the instructions for making a Waterfall Card.


Items
1 piece of card 14cm x 14cm
1 piece of card 18cm x 4.5cm
4 pieces of card 4.5cm x 4.5cm
1 piece of card 10cm x 1.5cm
4 Images 4cm x 4cm
1 piece of patterned paper 13.5cm x 13.5cm
2 brads
1 Piece of Ribbon & Sentiment


Step 1, Attach all four images onto the 4.5cm pieces of coloured card


Step 2. Score lines along the 18cm piece of card at 4.5cm, 5.5cm. 6.5cm & 7.5cm 


Step 3, Attach the 10cm piece of card onto the bottom of the scored strip (at the bottom end) as shown.


Step 4,  Bend the scored strip over onto itself so that the longer piece is underneath. Attach the first image inline with the 1st scored line.


Step 5,  Attach the second image to the strip inline with the second scored line


Step 6, Attach the third image to the strip inline with the third scored line


Step 7, Attach the final image to the strip inline with the fourth scored line.


Your completed strip should now look like this.


Step 8, Attach the 13.5cm x 13.5cm patterend paper to the 14cm x 14cm piece of coloured card (leaving a border all the way round).


Step 9, Place the waterfall strip onto the panel and using a pokey tool, pierce a hole in the horizontal strip either side of the waterfall.


Step 10, Push brads through the holes on the strip and open up at the back to secure.


Step 11, Add a piece of ribbon onto the bottom of the waterfall as a pull. Cover this with a sentiment to hide to join.


Step 12, Attach the panel onto the front of a 14.5cm x 14.5cm square card and decorate if required.

Hope you have found this tutorial easy to follow. Do let us know if you make a card using this tutorial,we would love to see your creations.

Lyndsey xx