Back today with another tutorial, I did squeeze you an extra one in this Tue (easter treat bag) but for some reason it didnt publish. Never mind if you scroll down you can see the tutorial under this one, so you have 2 to choose from today.
Todays tutorial is a Free Standing Pop Up Card, they look fabulous and the best thing is they do fold flat for posting.
Items
12 x 12 Card Stock
A4 Patterned Paper
Ribbon
3 Lrg Size Nesties
Die Cut Butterfly
Die Cut Sentiment
Step 1, Trim a piece of card to 28cm x 14.5cm
Step 2, Score your card at 2.5cm, 7cm, 9.5cm, 14cm, 18.5cm, 21cm & 25.5cm
Step 3, Along the centre (14cm) score line measure a point in 2cm from either side of the card.
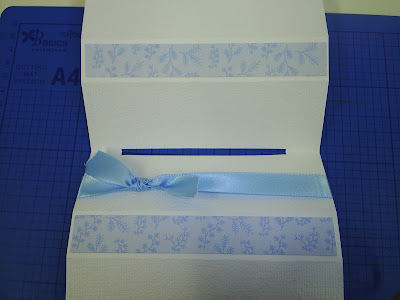
Step 4, Trim a slit out of the centre of the card between the 2cm points.
Step 5, Trim 2 peices of paper to 14cm x 2cm.
Step 6, Turn the card over to the good side and attach paper in the 2.5cm wide panels as shown.
Step 7, Using 3 Nesties Die Cut 2 pieces of card and 1 piece of patterned paper, layer together as shown.
Step 8, Wrap ribbon round one of the 4.5cm middle panels and tie a knot/bow
Step 9, Turning your card over so the back is facing you. Fold one of the 2.5cm flaps in, take your layered center piece, push through the slot and attach to the flap.
Step 10, Fold the card over and bring the two 2.5cm flaps together, folding them together inside the card.
Your card should look like this when standing up.
Step 11, Add a Die Cut butterfly and sentiment to finish.
Hope you have enjoyed this tutorial, do let us know if you make a card using this tutorial we would love to come and have a nosey.
Lyndsey xx


Thanks for the tut! i love these!
ReplyDelete