Hi all,
Today I have a tutorial showing you have to make this fabby Circular Stepper Card

Ok then - so to start with you will need the following
--------------------------------------
7" Circle Die or Circle shape to cut around
Three Little Party Girls digi image (obviously)
Promakers (colours listed below)
Spellbinders Fancy Oval Die & Plain Oval Die
Pretty Papers
Flowers, Ribbon, Pearls
-----------------------------------------
Step 1 - Die Cut or cut out your Circle Shape ( I have used a Grand Nestie which is approx 7" or you can use a Dinner Plate etc of a similar size)
.jpg)
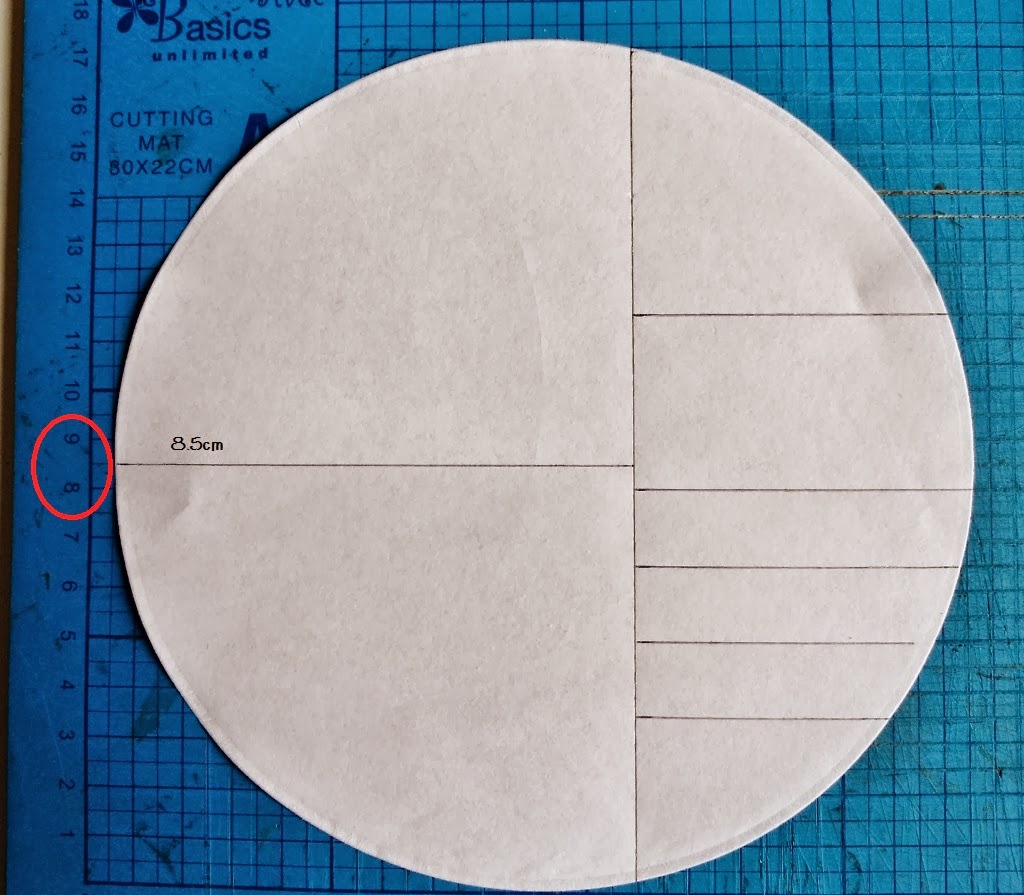
Step 2 - Place your circle on your cutting mat & measure across 10.5cm from Left - Right on your circle and draw a vertical feint line

You will score your steps on the RH side -which will be on the LH side when the card is folded
Step 3 - Scoring between the 10.5cm line & the RH edge score lines at the following measurements
3.5cm, 5cm, 6.5cm, 8cm & 11.5cm

Step 4 - Scoring from the LH side to the 10.5cm line score a line across at 8.5cm

Step 5 - Split the circle open by cutting along the vertical line between the 3.5cm & 11.5cm score lines

Step 6 - Fold your card into shape with Mountain & Valley folds as shown
(if at this point you would like your steps to be on the opposite side instead - fold your score lines the opposite to shown - ie a valley would be a mountain)
.jpg)
Step 7 - Trim off the excess steps that overhang the circle

Step 8 - Cover the front of the card & steps with patterned paper
(I have used First Edition papers - New Bloom)

Step 9 - Print & colour your image, cut out using a Plain Oval Die
Step 10 - Die Cut the Fancy Oval from coloured card - Mat your image onto this
 ----------------------------------
Promarkers used to colour the image as follows
Skin - Burnt Orange, Coral, Soft Peach, Oatmeal, Blush
Hair - Black, Cool Grey 5,4,3 & 1
Skirt - Plum, Purple, Amethyst, Orchid
Top - Petrol Blue, Turquoise, Marine, Cool Aqua
-------------------------------------
Step 11- Add the image to the RH side of your card using foam pads

Step 12 - Decorate the rest of the card using flowers & embellishments to suit
(make sure that your card weight is balanced and not too heavy on one side or your card will lean)
--------------------------------------
7" Circle Die or Circle shape to cut around
Three Little Party Girls digi image (obviously)
Promakers (colours listed below)
Spellbinders Fancy Oval Die & Plain Oval Die
Pretty Papers
Flowers, Ribbon, Pearls
-----------------------------------------
Step 1 - Die Cut or cut out your Circle Shape ( I have used a Grand Nestie which is approx 7" or you can use a Dinner Plate etc of a similar size)
.jpg)
Step 2 - Place your circle on your cutting mat & measure across 10.5cm from Left - Right on your circle and draw a vertical feint line

You will score your steps on the RH side -which will be on the LH side when the card is folded
Step 3 - Scoring between the 10.5cm line & the RH edge score lines at the following measurements
3.5cm, 5cm, 6.5cm, 8cm & 11.5cm

Step 4 - Scoring from the LH side to the 10.5cm line score a line across at 8.5cm
Step 5 - Split the circle open by cutting along the vertical line between the 3.5cm & 11.5cm score lines

Step 6 - Fold your card into shape with Mountain & Valley folds as shown
(if at this point you would like your steps to be on the opposite side instead - fold your score lines the opposite to shown - ie a valley would be a mountain)
.jpg)
Step 7 - Trim off the excess steps that overhang the circle

Step 8 - Cover the front of the card & steps with patterned paper
(I have used First Edition papers - New Bloom)

Step 9 - Print & colour your image, cut out using a Plain Oval Die
Step 10 - Die Cut the Fancy Oval from coloured card - Mat your image onto this
 ----------------------------------
Promarkers used to colour the image as follows
Skin - Burnt Orange, Coral, Soft Peach, Oatmeal, Blush
Hair - Black, Cool Grey 5,4,3 & 1
Skirt - Plum, Purple, Amethyst, Orchid
Top - Petrol Blue, Turquoise, Marine, Cool Aqua
-------------------------------------
Step 11- Add the image to the RH side of your card using foam pads

Step 12 - Decorate the rest of the card using flowers & embellishments to suit
(make sure that your card weight is balanced and not too heavy on one side or your card will lean)


Hope you enjoyed the tutorial
Lyndsey xx