Hi all,
Today I have a tutorial showing you have to make this fabby Circular Stepper Card

Ok then - so to start with you will need the following
--------------------------------------
7" Circle Die or Circle shape to cut around
Three Little Party Girls digi image (obviously)
Promakers (colours listed below)
Spellbinders Fancy Oval Die & Plain Oval Die
Pretty Papers
Flowers, Ribbon, Pearls
-----------------------------------------
Step 1 - Die Cut or cut out your Circle Shape ( I have used a Grand Nestie which is approx 7" or you can use a Dinner Plate etc of a similar size)
.jpg)
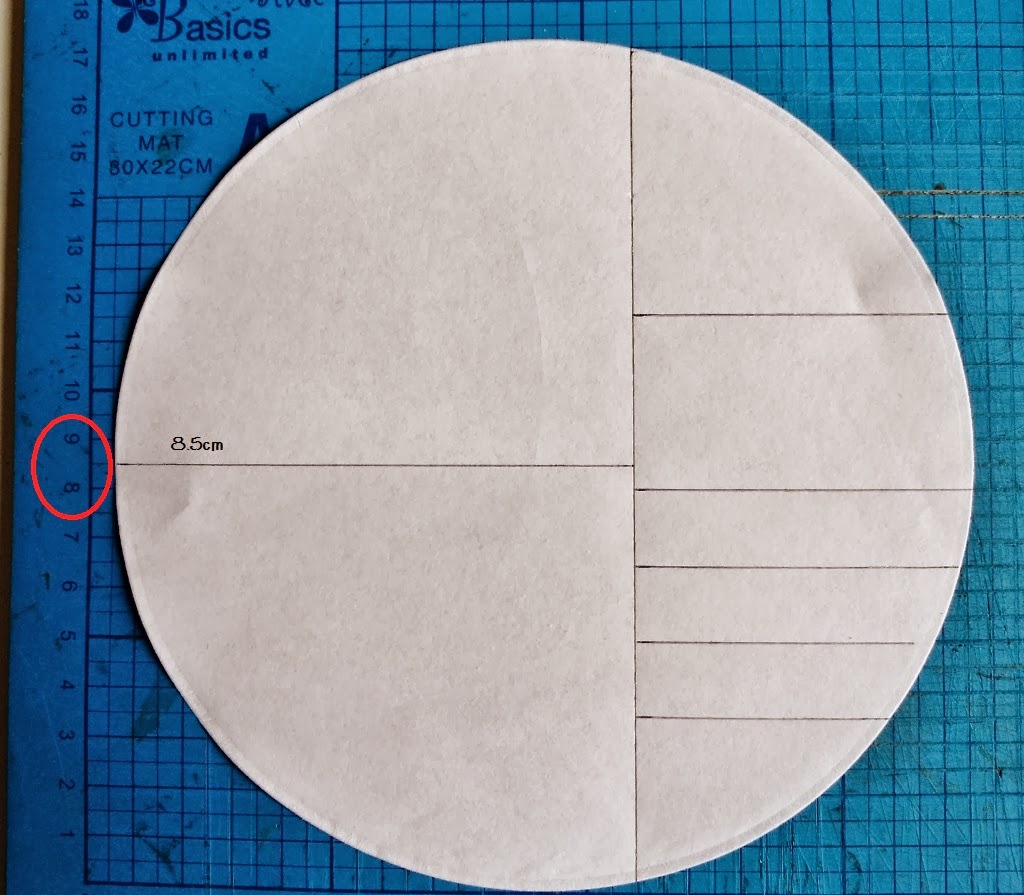
Step 2 - Place your circle on your cutting mat & measure across 10.5cm from Left - Right on your circle and draw a vertical feint line

You will score your steps on the RH side -which will be on the LH side when the card is folded
Step 3 - Scoring between the 10.5cm line & the RH edge score lines at the following measurements
3.5cm, 5cm, 6.5cm, 8cm & 11.5cm

Step 4 - Scoring from the LH side to the 10.5cm line score a line across at 8.5cm

Step 5 - Split the circle open by cutting along the vertical line between the 3.5cm & 11.5cm score lines

Step 6 - Fold your card into shape with Mountain & Valley folds as shown
(if at this point you would like your steps to be on the opposite side instead - fold your score lines the opposite to shown - ie a valley would be a mountain)
.jpg)
Step 7 - Trim off the excess steps that overhang the circle

Step 8 - Cover the front of the card & steps with patterned paper
(I have used First Edition papers - New Bloom)

Step 9 - Print & colour your image, cut out using a Plain Oval Die
Step 10 - Die Cut the Fancy Oval from coloured card - Mat your image onto this
 ----------------------------------
Promarkers used to colour the image as follows
Skin - Burnt Orange, Coral, Soft Peach, Oatmeal, Blush
Hair - Black, Cool Grey 5,4,3 & 1
Skirt - Plum, Purple, Amethyst, Orchid
Top - Petrol Blue, Turquoise, Marine, Cool Aqua
-------------------------------------
Step 11- Add the image to the RH side of your card using foam pads

Step 12 - Decorate the rest of the card using flowers & embellishments to suit
(make sure that your card weight is balanced and not too heavy on one side or your card will lean)
--------------------------------------
7" Circle Die or Circle shape to cut around
Three Little Party Girls digi image (obviously)
Promakers (colours listed below)
Spellbinders Fancy Oval Die & Plain Oval Die
Pretty Papers
Flowers, Ribbon, Pearls
-----------------------------------------
Step 1 - Die Cut or cut out your Circle Shape ( I have used a Grand Nestie which is approx 7" or you can use a Dinner Plate etc of a similar size)
.jpg)
Step 2 - Place your circle on your cutting mat & measure across 10.5cm from Left - Right on your circle and draw a vertical feint line

You will score your steps on the RH side -which will be on the LH side when the card is folded
Step 3 - Scoring between the 10.5cm line & the RH edge score lines at the following measurements
3.5cm, 5cm, 6.5cm, 8cm & 11.5cm

Step 4 - Scoring from the LH side to the 10.5cm line score a line across at 8.5cm
Step 5 - Split the circle open by cutting along the vertical line between the 3.5cm & 11.5cm score lines

Step 6 - Fold your card into shape with Mountain & Valley folds as shown
(if at this point you would like your steps to be on the opposite side instead - fold your score lines the opposite to shown - ie a valley would be a mountain)
.jpg)
Step 7 - Trim off the excess steps that overhang the circle

Step 8 - Cover the front of the card & steps with patterned paper
(I have used First Edition papers - New Bloom)

Step 9 - Print & colour your image, cut out using a Plain Oval Die
Step 10 - Die Cut the Fancy Oval from coloured card - Mat your image onto this
 ----------------------------------
Promarkers used to colour the image as follows
Skin - Burnt Orange, Coral, Soft Peach, Oatmeal, Blush
Hair - Black, Cool Grey 5,4,3 & 1
Skirt - Plum, Purple, Amethyst, Orchid
Top - Petrol Blue, Turquoise, Marine, Cool Aqua
-------------------------------------
Step 11- Add the image to the RH side of your card using foam pads

Step 12 - Decorate the rest of the card using flowers & embellishments to suit
(make sure that your card weight is balanced and not too heavy on one side or your card will lean)


Hope you enjoyed the tutorial
Lyndsey xx
No comments:
Post a Comment